
Gaming Cabinet Artwork Specifications: The Four Numbers
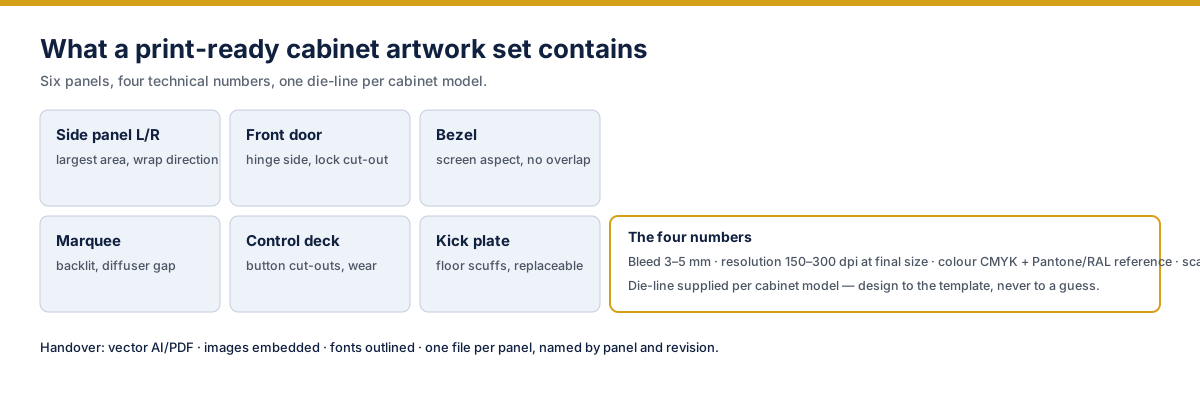
Four numbers cause most of the difference between artwork that prints cleanly and artwork that comes back for rework. They apply whether the panel is UV printed, wrapped or used as a colour reference for powder coat.
| Number | What we ask for | What goes wrong when it is missing |
|---|---|---|
| Scale | 1:1 at final panel size — not "fit to panel" | Artwork is re-scaled by the printer and the aspect ratio drifts |
| Bleed | 3–5 mm beyond the trim line on every edge | White slivers at the panel edge after trim or wrap |
| Resolution | 150–300 dpi at final size for raster elements | Visible pixelation at viewing distance on side panels |
| Colour | CMYK build plus a Pantone or RAL reference for brand colours | Brand colour drifts between the proof, the batch and the powder-coated parts |
These are working ranges, not universal rules — a curved wrap and a flat UV-printed panel are not printed the same way, so the confirmed requirements come with the die-line for your cabinet model.
Arcade Cabinet Artwork Size, Panel by Panel: What to Supply
Six panels carry almost all themed cabinet artwork. Each has its own constraint, and each should be a separate file.
| Panel | What to watch | File to supply |
|---|---|---|
| Side panels (left / right) | Largest surface; wrap direction and seam position decide how the image reads in a row | One file per side, mirrored only if the design allows |
| Front door | Hinge side, lock cut-out and service opening cut into the artwork | Door die-line with cut-outs marked |
| Bezel | Screen aspect and aperture overlap — artwork must not reach the visible display area | Bezel die-line, with the aperture masked |
| Marquee | Backlit: needs a diffuser gap and lower ink density than a flat panel | Marquee file plus a note on the lighting behind it |
| Control deck | Button cut-outs and the highest wear on the machine | Deck die-line with button positions and a laminate note |
| Kick plate | Floor scuffs; usually a solid colour or replaceable print | Colour reference, or a low-detail print file |
Cabinet Artwork Die-Line: Design to the Template, Not to a Guess
A die-line is the flat outline of a panel with its cut-outs, folds and safe margins marked. Ours is issued per cabinet model, because two cabinets that look similar from the front rarely share panel dimensions once the door, bezel and deck are measured.
- Ask for the die-line before the designer starts. Layout decisions made on an assumed panel size are usually thrown away.
- Do not scale a die-line. If the cabinet model changes, request the new one — a scaled template produces cut-outs in the wrong place.
- Keep the safe margin. Artwork inside the trim line but outside the safe area can be lost to a fold or a wrap edge.
If the cabinet model is not yet chosen, the format decision comes first: upright, bartop, wall-mounted and tabletop builds each have different dominant surfaces.
Colour References: CMYK, Pantone and RAL
A themed cabinet is usually a mix of printed panels and powder-coated parts. Those two processes do not produce the same colour from the same reference, so the reference has to be named twice.
| Part | Reference to give | Why |
|---|---|---|
| Printed panels | CMYK build + Pantone for brand colours | Print engines match Pantone more consistently than a screen colour |
| Powder-coated panels | RAL number | RAL is the powder-coat language; Pantone has to be translated and then matched by eye |
| Across both | One signed physical or digital proof | The proof is the acceptance reference; without it, "matches the file" is an opinion |
Three effects need an explicit conversation rather than a reference: metallics, neon/fluorescent areas, and smooth gradients across a curved wrap. They are achievable on some routes and not others, and the choice changes the quote line.
The File Set We Preflight
- Vector source: AI or PDF, 1:1, editable where possible
- Raster elements: 150–300 dpi at final size, embedded — not linked
- Fonts outlined, or the font files supplied with a licence note
- One file per panel, named panel_revision (for example side-left_v3)
- Colour references listed on a single sheet: CMYK build, Pantone, RAL for adjacent parts
- Logo supplied as vector, plus a note on minimum size and clear space
- Any licensed element accompanied by the authorisation reference
Preflight checks these before a proof is produced. Catching a missing bleed or a linked image at this stage costs a file exchange; catching it after plate or print set-up costs a reprint.
Eight Reasons Artwork Gets Rejected
| Cause | What it looks like | Fix |
|---|---|---|
| Wrong scale | Artwork dimensioned to a screenshot, not the panel | Re-lay out on the issued die-line |
| No bleed | Trim line touching the image edge | Extend the background 3–5 mm |
| Linked, not embedded images | Files arrive with missing links | Embed and re-export |
| Fonts not outlined | Substituted typeface in the proof | Outline or supply licences |
| RGB-only colour | Brand colour shifts after conversion | Convert to CMYK and add Pantone |
| Artwork into the display aperture | Printed area visible inside the bezel opening | Mask the aperture on the die-line |
| Backlit panel at print density | Marquee looks muddy when lit | Reduce ink density and test under the actual LED |
| No revision name | Two files called "final" | Panel + revision naming, one current file |
Handover and Revision Naming
After the proof is signed, the file set becomes the reference for every reorder. Three habits keep reorders clean:
- The signed proof carries a reference that appears on the quotation and the acceptance record.
- Each panel file carries its own revision; a changed side panel does not silently update the marquee.
- Where a batch is repeated months later, the reorder is matched to the same file revision — the same principle used for cabinet spare parts matched by model and revision.
Send the file set with the brief: the twelve fields on the cabinet RFQ template cover everything except the artwork itself.
Frequently Asked Questions
What resolution should cabinet artwork be?
Raster elements at 150–300 dpi at final panel size. Larger side panels are usually viewed from a distance and hold up at the lower end; bezels, marquees and control decks sit closer to the player and need the higher end. Vector elements have no resolution limit and should stay vector.
How much bleed does a cabinet panel need?
We ask for 3–5 mm beyond the trim line on every edge. The exact figure comes with the die-line for your cabinet model, because wrap edges and folded panels take up more than a flat trimmed panel does.
Can you design the theme for us, or do we send finished artwork?
Both paths exist. Print-ready artwork goes straight to preflight and proof. A design brief goes to layout, where the theme is developed on the issued die-line and returned as a proof for approval before print. The two paths carry different quote lines, and the choice is recorded on the quotation.
What happens if a printed panel is damaged in service?
A UV-printed or wrapped panel is replaced rather than patched: the original file revision is reprinted so the replacement matches the batch. This is why panel files are kept with their revision names, and why spare-panel strategy is agreed at order stage on linked banks.
Figures, formats and artwork requirements above are confirmed per configuration on the quotation. Certification and market-approval status is stated per configuration and per market — never assumed from a render or a proof.
Request the Die-Line and Preflight Check
Send your cabinet model and the artwork you have. We return the die-line set, a preflight result and the colour reference sheet before any proof is produced.
Request the Die-Line →